Click on My Students tab in S&T Connect.
Main Content
Overview
S&T Connect provides users with the ability to interact with their students through a number of tracking items, which may be used to raise alerts (Flag students) or provide encouragement (give Kudos). Flags and Kudos provide a convenient way to notify individuals throughout campus about student concerns or successes.
Raise Tracking Items
Use Flags, Kudos and Progress Surveys
S&T Connect includes two types of tracking items: Flags and Kudos. The Progress Survey feature allows instructors to quickly raise tracking items on students in their classes.
Very often, instructors will receive an email requesting them to complete a progress survey for their courses at key points during a term. A progress survey provides instructors with a quick way to raise alerts on students by course. Your S&T Connect administrator sets up when the survey will be sent out, which courses will be surveyed, and which alerts to include for your feedback.
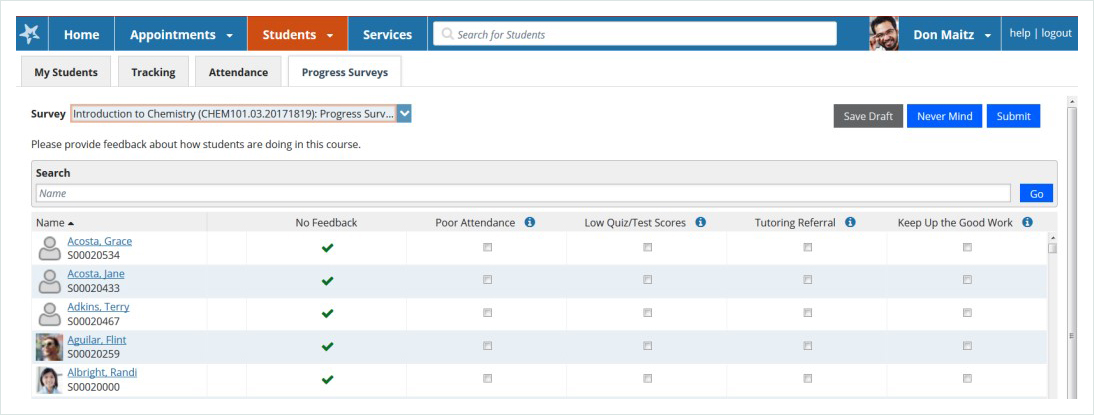
When you respond to a progress survey, your input on the survey raises the corresponding alerts as if you had raised them manually, and your permissions to view or update the Flags raised from a progress survey are the same as if you had raised the Flags manually.
Once you click 'submit' on a progress survey, the items that you marked will be raised on the students you selected, and you will no longer have access to a survey for that class section.
For a video demonstration about how to respond to a Progress Survey, watch Respond to a Progress Survey.
Depending on the role(s) you have in S&T Connect, and the permissions that have been set on each alert, you may have permission to view or manage one or more Flags for your students.
![]()
The View permission means that when the Flag is raised on one of your students, that Flag will appear on your Students/Tracking tab as well as in the Tracking tab within that student's folder, and you will be able to review the comments included by the Flag raiser. The Manage permission allows you to do the following:
- Add comments to a Flag that has already been raised
- Review comments added by other Flag managers
- Clear (resolve) the Flag
Your role may also have permission to assign active Flags to yourself or other team members that have Manage permission on the Flag.
View and Manage Raised Items
Once an item has been raised, faculty and staff can view and manage those items.
If you have permission to view tracking items raised for your students, you will see them displayed in the student's folder and in the Tracking sub-tab within your Students tab in S&T Connect. When viewing tracking items, hover over the icon beside each tracking item to take additional actions based on your role permissions.
Resolve or Clear Tracking Items
Depending on the products licensed and features used by your institution, you may have access to view and/or manage one or more tracking items in Starfish (example: Flags or To-Dos). If you have manage permissions for a tracking item for a particular student, you will be able to resolve the tracking item (example: it is no longer an issue or your work on the issue is completed).
You can resolve a single item, or multiple items at once.
Tracking items can be viewed and resolved/cleared from a number of places, including the following:
- Students tab
- Recent Changes channel on your Starfish Home page
- The Student Folder Tracking tab
Resolve items from any of these locations as follows:
1. When viewing the tracking item, hover over the icon to the left of the tracking item name.
![]()
2. Select the resolution option (Clear Flag or Remove Kudo) for the selected tracking item.
![]()
3. In the form that opens, you may be given the option to select a reason, and you will be prompted to add a resolution note.
4. If you are clearing an item you did not raise, you can also provide a detailed Close the Loop comment for the flag raiser.
*Note : If you are clearing a Flag that was raised by a student, sending a close loop message is not recommended. Check to ensure that the "send message" box is unchecked.
5. Click Submit to clear the item.
For a video demonstration of both clearing flags and closing the loop, watch Close the Loop When Clearing a Flag.
1. Navigate to Students > Tracking.
2. Use the checkboxes next to each student's name to select the items to be resolved.
*Note : there will not be a checkbox next to any items for which you do not have Manage permissions.
![]()
3. Select the Resolve button in the action bar at the top of the page. In the form that opens, the number of items being resolved is noted in the form's header (example: "Mark 2 Flags as Cleared").
4. Verify the selected number of items and add a resolution comment that is applicable to all of the selected items. If you haven't raised the items being cleared, you will also be prompted to add a close loop comment. You may also be prompted to select a reason for clearing the item.
5. Click the Submit button to clear the selected items.